Aprés Yoga for Winter Adventure Recovery
Winter is here! Whether your sport is snowboarding, skiing, XC skiing, snowshoeing, or backcountry exploring, your body and mind will appreciate some post-effort recovery.
After a day (or even a couple hours) of playing in the snow, I like to incorporate a little bit of yoga to help my muscles relax and to release any tension I might have (from dodging tourists on mountain run, making backcountry decisions, and driving to and fro).
I have found the following yoga poses to be beneficial in stretching the key muscles engaged, as well as improving strength, coordination and proprioception.
Dancer aka Lord of the Dance, Natarajasana

A modified version of this pose will allow you to stretch the quadriceps, the psoas, and work on your balance, without putting too much strain on your back. This is fun to try in the parking lot, once you have your snow boots on (ski boots NOT recommended due to their low coefficient of friction).
Stand on both feet, spine in its natural curvature, shoulders over hips, hips over knees, knees over ankles. Inhale and shift your weight to your right foot as you lift your left foot towards your left buttock, by bending the knee. Hold your left foot with your left hand as your right hand extends towards the sky. Keep the left hip from opening up by pressing your left foot into your left hand. You will feel a stretch in your left quadriceps, and your left chest may open up too.
Gently release your left foot, and shake out both legs. (This step is enhanced if you have some sweet tunes emanating from your Jammy Pack or your car stereo). Shift your weight onto your left foot and try the right side out. You may be surprised at how different each side is, but it’s fairly common. Yoga is great for giving us direct feedback on our imbalances and strengths.
The full pose entails your left thigh parallel with the earth and a large backbend in your thoracic spine (mid back). This is recommended only if your muscles are warmed up and your body is open in these areas. Otherwise, play with your balance, stretch your quads, and smile!
Wide-legged Forward Fold, Prasarita Padottanasana C

This pose is great for stretching your hamstrings while simultaneously opening your shoulders which may have been hunched in due to cold or during your drive. This is another good one for the parking lot, with your snow boots on.
Stand with your legs wide, with your ankles approximately under your wrists if your arms are spread out in a tee. Your feet should be facing directly forward with the outer borders of your feet parallel to your yoga mat. Clasp your hands behind your back (or grab opposite elbows if your shoulders are tight), and draw your shoulder blades down your back so that the top of your shoulders moves away from your ears. Lift your kneecaps to engage your quadriceps as you bend at the hips. Keep your back straight and parallel with the earth, and bend to 90 degrees. If you are feeling this in the back of your legs, stay there and let your hamstrings get the stretch they need. If you need more, continue bending at your waist, bringing your clasped hands up and towards the back of your head with your arms straight, and your head towards the ground.

Check where your weight is in your feet; it typically shifts back to the heels. If that’s the case, rock forward so that it is evenly distributed in all four corners of your feet.
Engage your quadriceps and bring your torso back to parallel. Inhale and then bring your torso back upright, such that your shoulders are over your hips. Release your hands and shake them out.
Downward Facing Dog, Adho Mukha Svanasana
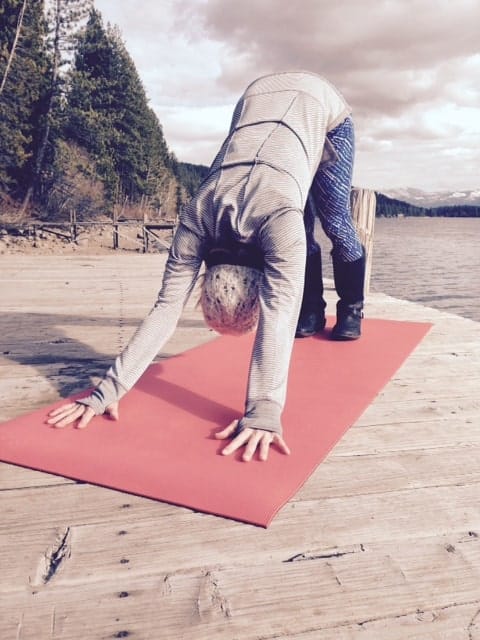
Downward Facing Dog is a yoga staple for many reasons; it stretches the back of the legs, it opens up the back, it literally changes your perspective, and it can help the nervous system transition from the sympathetic nervous system (fight or flight or send a big jump) to the parasympathetic nervous system (rest and digest).
Place your hands with the wrist creases parallel to the top of your mat. Walk your feet back so that if you were to come to a plank, your legs would be straight and your shoulders would be directly over your wrists. Feet are hip width with the outer borders of the feet parallel to the long edge of your mat.
Push into your hands, specifically the area between the thumb and first finger, lift the forearms away from the mat, and engage the biceps to rotate your upper arms to the outside (right arm rotates clockwise, left arm rotates counter clockwise). Move the top of the shoulders away from the ears and feel your spine lengthen. (This should feel great). Lift your hips to the sky as you begin to straighten your legs, but if your hamstrings are really tight, you can bend one knee and then the other, or even both, to lessen the intensity. The goal of this pose is mainly to lengthen the spine, although, after time, the heels may come to the earth. You can also work on opening the hips in this pose, by rotating the right inner thigh towards your mat (counterclockwise) and the left inner thigh towards your mat (clockwise), which will open the sacroiliac joint.
Low Lunge, Anjaneyasana

From Downward Facing Dog, step your right foot forward, between your hands. Bring your right knee directly over your right ankle, so that it forms a 90-degree angle. Scoot your left knee back so that it is behind your left hip and you feel a nice stretch in the front of your left thigh, groin, hip flexors, and psoas. Uncurl your back toes so that the entire top of the left foot is on your mat, with your toes going straight behind you.
Bring your hips to vertical and your shoulders over your hips to elongate the spine and intensify the stretch in your left thigh. Raise your arms overhead, palms facing each other or touching, to intensify the stretch in the psoas. Breathe and smile. Hold for a minute; exhale to bring your torso down to your right thigh and your hands on the mat, on either side of your right foot. Curl your left toes under, exhale, lift your left knee and step your right leg back to Downward Facing Dog.
Take a few breaths in Downward Facing Dog, then step your left foot forward, between your hands, and repeat the sequence with your left foot forward, for the same amount of time.
King Arthur’s Pose

This pose is an intense quadriceps stretch and posas stretch. It feels great after snowboarding, skiing, or bike riding. Start in a tabletop position, on your hands and knees, facing away from the wall (or ottoman, pier post, etc.), toes tucked under and soles of the feet against the wall. Bring your bent left knee against the base of the wall, so that the top of your left foot and your left shin are against the wall, left shin and toes pointing towards the sky. Step your right foot forward into a lunge, with the right knee over the right ankle, making a 90-degree bend at the knee. (I recommend keeping a sock on the foot that will go up the wall, because the top of the foot can be a little sensitive.)
Bring your hips to a vertical position and press your left foot and shin into the wall. Bring both hands to your right knee, and feel the stretch in your left quadriceps. This might be plenty for you, if so, stay here. To move deeper, extend both arms overhead. Stay in the pose for 5-20 breaths, allowing the quadriceps muscles to relax and lengthen. To come out of the pose, bring your hands to the floor, and take your left shin off the wall.
Repeat on the other side, for the same length of time.
Toe Cruncher Pose

Our toes and feet take a beating and especially in the winter, they are crammed into shoes all the time. Ski boots are even harder on our feet (yet another reason to snowboard!).
To stretch the bottom of the feet, curl both toes under, press the inner edge of the feet against each other, with both knees touching. Sit on the heels of your feet, bringing your hips to vertical and your shoulders over your hips. Breathe into the pain and let the bottom of your feet and toes stretch. Take at least 10 breaths into the pose and try to relax.
Seated Twist, Marichyasana III
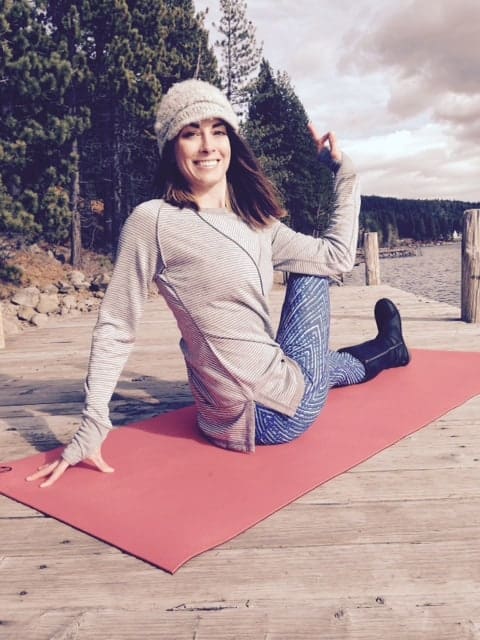
This pose is great for stretching the outer hip and gluteus, as well as incorporating a twist, which is like a massage for your internal organs. Sit on your mat with both legs straight in front of you, feet active and toes pointing up to the sky. Bring your right foot to the outside of your left leg, knee pointing up. Bring your right hand behind your right hip. Inhale and lift your left arm to the sky. Contract your abdominals, especially your transverse abdominus (the muscles that contract when you cough), and twist to the right, beginning the twist from the base of your spine. Bring your left outer arm to the outer edge of your right thigh, to open the shoulders and deepen the twist. You can play with engaging and releasing the abdominal muscles to see how that feels. The gaze can start to come over your right shoulder. Stay here for a few breaths.
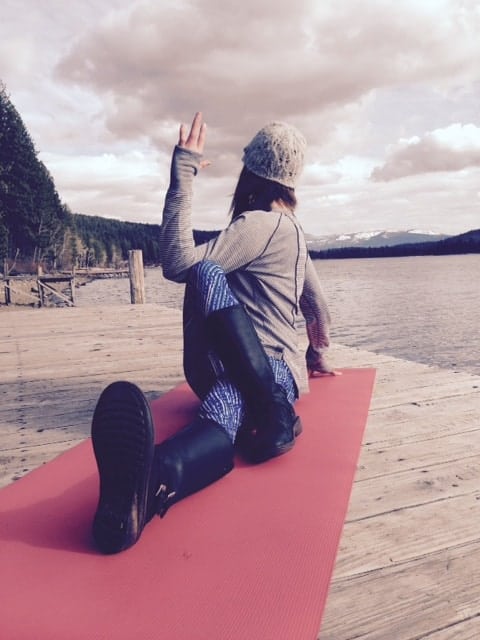
To come out of this pose, exhale to unwind and release your right leg down to the mat. Shake out both legs. Repeat on the left side.
Legs up the Wall Pose, Viparita Karani

The last pose in this sequence is an inversion, which is great for relaxation and resetting the nervous system. It is also good for giving your tired legs a much needed rest.
Sit with you right hip directly against the wall, so that your body is sideways next to the wall. Lay on your side as you swing both legs up the wall. The goal is to have your sitting bones as close to the base of the wall as possible. Both legs should be straight up from your hipbones. Keep your legs relatively firm, just enough to keep them in place. Feel your torso lengthen away from the wall and the back of your head press into the ground, so that the spine is in its natural curvature. Open your shoulder blades away from your spine and bring your arms to a “cactus” position, palms facing up. Shut your eyes and let your breathing come naturally. Stay here for 5-15 minutes.
To come out of this pose, bend your knees and roll to one side, resting your head on your arm, coming to a fetal position. Use your hands to push yourself to a seated position and sit here for a moment, appreciating the time you took for your wellbeing. Open your eyes and enjoy the rest of your day!

Aprés Beverage – “Hot Mama”
Ingredients:
– 1 juiced Meyer Lemon
– 1 tsp fresh grated ginger (or powdered)
– dash of cayenne
– couple dashes of cinnamon
– 1 large spoonful of honey
– (optional) 1.5 oz of Bourbon (optional, but I enjoy Bulleit)
– hot water
Put all ingredients except water and honey in your cup. Pour in hot water. Stir in honey. Warm your hands around your mug as you inhale the lovely aromas mingling. Enjoy. If you want to make this in advance, fill your thermos with hot water and lemon juice and bring the spices, honey, and Bourbon to add to your cup. Not only does this taste delish and warm you up, it’s also good for the immune system (raising internal temperature, burning off bad bacteria/viruses, and alkalizing your system). And, you get to drink bourbon. Winning, Duh.
Namaste,
Coral
Share this
Popular posts


Leave a comment